Gib Editor:
Basicly, a paste from my post in the Build 19 Testing forum. Here as a topic so all may see it.
Makeshift Gib Editor TutorialThis tutorial assumes you know what 'define' means.To begin using the Gib Editor on your mod, some preparation is needed:
Preparation!First, open up the .rte of the mod you want to run through the Gib Editor. For example: I want to run my Super Duper Weapon through the Gib Editor, so I would open superduperweapon.rte
In the .rte, create a new folder and name it NewData.
Then, if you have any custom gibs you want to use in the Gib Editor, you need to
copy the code of those gibs and put them in Base.rte/Effects/Gibs/Gibs.ini. Code goes in Gibs.ini. Be sure your custom gibs are assigned to a group (AddToGroup = Gib Legacy), otherwise you can't see them on the menu!
There, all set!
The Gib Editor..is really easy to use.
Load up the object you wish to gib from the menu (i.e. superduberweapon), and it will appear partially transparent. You can then add gibs to it, including the custom ones you may or may not have added. You can remove gibs, test gibs, etc etc.. all in the pie menu.
When you are satisfied with the gibbing, save it using the pie menu. It should ask if you want it to save in yourmod.rte/NewData (((For example, saving superduberweapon would ask me if it wanted to save in superduberweapon.rte/NewData))).
Hit yes, then hit yes again.. etc etc.. it's all very easy.
Now what?Pay attention, it gets a bit more difficult here and I am assuming you know where an object's gibbing is defined (Hint: bottom of the object's code)
Open up the NewData folder and you should see a new YOURMOD.ini in it. Open it up and you'll see some code. This is the gibbing code, nothing more nothing less. After you are done copying it, go back to the original .ini in which your object resides.
Copy the code (All of it, EXCEPT for the InstanceName and the line above it) and paste it over the original gibbing code in your object's code, don't paste over GibWoundLimit and such. Save.
And there! You're done, go gib stuff.
Where's the 'original' gibbing code that I have to paste over?...
Code:
AddDevice = HDFirearm
InstanceName = SUPER DUPER WEAPON LOLOL
AddToGroup = Weapons
Mass = 2554846534
HitsMOs = 0
GetsHitByMOs = 1
SpriteFile = ContentFile
FilePath = Base.rte/Devices/Cannons/Long.bmp
FrameCount = 2
SpriteOffset = Vector
X = -18
Y = -5
EntryWound = AEmitter
CopyOf = Dent Metal
ExitWound = AEmitter
CopyOf = Dent Metal
GoldValue = 730324234
AtomGroup = AtomGroup
AutoGenerate = 1
Material = Material
CopyOf = Military Stuff
Resolution = 4
Depth = 0
DeepGroup = AtomGroup
AutoGenerate = 1
Material = Material
CopyOf = Military Stuff
Resolution = 4
Depth = 10
DeepCheck = 1
JointStrength = 75
JointStiffness = 0.5
JointOffset = Vector
X = -8
Y = 3
DrawAfterParent = 0
StanceOffset = Vector
X = 6
Y = 6
SharpStanceOffset = Vector
X = 9
Y = 2
SupportOffset = Vector
X = 0
Y = 5
SharpLength = 400
Magazine = Magazine
CopyOf = Magazine Cannon
ParentOffset = Vector
X = -3
Y = 4
Flash = Attachable
CopyOf = Muzzle Flash Shotgun
FireSound = Sound
AddSample = ContentFile
FilePath = Base.rte/Devices/Cannons/BlamWhoshClick.wav
EmptySound = Sound
AddSample = ContentFile
FilePath = Base.rte/Devices/EmptyClick3.wav
ReloadStartSound = Sound
AddSample = ContentFile
FilePath = Base.rte/Devices/ReloadStart.wav
ReloadEndSound = Sound
AddSample = ContentFile
FilePath = Base.rte/Devices/ReloadEnd.wav
RateOfFire = 5023432424
ReloadTime = 1
FullAuto = 1
FireIgnoresThis = 1
ShakeRange = 14
SharpShakeRange = 1
NoSupportFactor = 5
ParticleSpreadRange = 3
ShellSpreadRange = 8
ShellAngVelRange = 0
MuzzleOffset = Vector
X = 19
Y = 0
EjectionOffset = Vector
X = -1
Y = -1
___---ORIGINAL GIB CODE BEGINS HERE, PASTE OVER THIS---___
AddGib = Gib
GibParticle = MOPixel
CopyOf = Spark Yellow 1
Count = 6
Spread = 2.25
MaxVelocity = 20
MinVelocity = 8
AddGib = Gib
GibParticle = MOPixel
CopyOf = Spark Yellow 2
Count = 9
Spread = 2.25
MaxVelocity = 20
MinVelocity = 8
AddGib = Gib
GibParticle = MOPixel
CopyOf = Drop Oil
Count = 5
Spread = 2.25
MaxVelocity = 10
MinVelocity = 1
AddGib = Gib
GibParticle = MOSParticle
CopyOf = Gib Metal Rust Micro A
Count = 7
Spread = 2.25
MaxVelocity = 15
MinVelocity = 5
AddGib = Gib
GibParticle = MOSParticle
CopyOf = Gib Metal Grey Micro A
Count = 6
Spread = 2.25
MaxVelocity = 15
MinVelocity = 5
AddGib = Gib
GibParticle = MOSRotating
CopyOf = Cannon Gib A
Count = 1
Spread = 2.25
MaxVelocity = 10
MinVelocity = 1
AddGib = Gib
GibParticle = MOSRotating
CopyOf = Gib Device Big C
Count = 1
Spread = 2.25
MaxVelocity = 10
MinVelocity = 1
___---ORIGINAL GIB CODE ENDS HERE, STOP PASTING---___
GibWoundLimit = 4
You pasted over GibWoundLimit, which resides underneath the gib code. Put it back. >:(
Stacking Shells: The Solution
Hey all, I'm just posting this here as an FYI. Please read and use this information for your mods, mostly the ones that eject many shells.
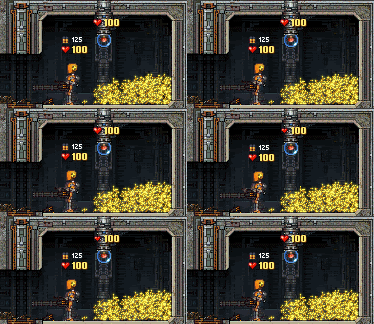
So, what's the problem? The problem is that shells stack. For the hunter on the move, this means nothing. But for the defender, particulary in a bunker, this means swimming through mountains of shells that build up as the fighting drags on. While it is.. somewhat.. easy to move and and fire through the shells, it's mostly a serious cosmetic problem. Mountains of shells filling your base and burying your defenders doesn't exactly help you immerse yourself in the action of fighting to the last gold ounce.
The below gif was taken using my WIP mod, the EE-1 Tempest. The Tempest has a 125 clip and was emptied 8 times before filming, totaling 1,000 shells expended.

Not very good. So how do we fix it?
One solution I found out, is to tweak the shells to be made of an extremely weak material, while being heavy enough to crush it's shell siblings, thus limited the shell stacking to about a 4-5 pixel-high pile.
The Tempest uses a mildly modified shell, mildly being a minor resprite. Otherwise it expels the exact same shell as all other shell spewing firearms do. Here's the code we have to modify.. it's a shell being defined, that's all:
Code:
AddAmmo = MOSParticle
InstanceName = TempestShell
HitsMOs = 0
GetsHitByMOs = 0
SpriteFile = ContentFile
FilePath = Tempest.rte/Shell.bmp
FrameCount = 8
SpriteOffset = Vector
X = -3
Y = -3
AngularVel = 5
Atom = Atom
Material = Material
CopyOf = Bullet Casing
TrailLength = 0
Framerate = 10
The procedure is simple, we add 'StructuralIntegrity = 0.00001' just below 'CopyOf = Bullet Casing' to weaken the current material; and we add 'Mass = 5.75' just below 'InstanceName = TempestShell' to make it much heavier.
The weight is enough to kill an actor, but "GetsHitByMOs = 0" insures that the shells won't even touch actors. Here is the finished code:
Code:
AddAmmo = MOSParticle
InstanceName = TempestShell
Mass = 5.75
HitsMOs = 0
GetsHitByMOs = 0
SpriteFile = ContentFile
FilePath = Tempest.rte/Shell.bmp
FrameCount = 8
SpriteOffset = Vector
X = -3
Y = -3
AngularVel = 5
Atom = Atom
Material = Material
CopyOf = Bullet Casing
StructuralIntegrity = 0.00001
TrailLength = 0
Framerate = 10
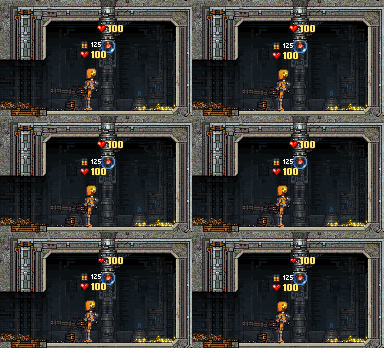
Now we fire 8 clips of 125 bullets, and let's see what 1,000 shells looks like now:

Yes, those are 1,000 shells on the floor. Same exact amount as the previous example. Much better!
When are you releasing the Tempest?The above tutorial is an old paste, the Tempest was already released. You can find it in mod packs or get it off someone in IRC.


